

Home and garden projects
 Aug 20th 2020, 10:37 pm
#1696
BE Forum Addict

Joined: Apr 2014
Location: Lauren's Co. SC by way of Palmetto, Florida
Posts: 3,265


They are something to tighten up the joints when you are assembling the top, they also give some stability to help with warpage and should the wood dry up a bit and shrink, thereby opening up the joint, you can crank the nuts up on the end of the bar and close up the joint.
Simply put, they are threaded bar which runs in a hole the width of the table (clever folks drill each plank first rather than trying to drill a three foot long hole!!) with a nut on each end. I'd probably use one bar for every three or four feet of length. They are easily spotted in tables, along the long edges, as the ends are capped with wooden plugs so you don't see a manky old nut.
Very much an old school thing, modern glues, kiln dried timbers and expense mean that you don't tend to see them in modern mass production tables.
 Aug 21st 2020, 1:07 pm
#1697
BE Enthusiast
Joined: Jun 2011
Posts: 388
RE: tensioning bars
Interesting. I did have difficulty with gaps between the table top planks. Looking back i would have spent longer trying to straighten them with a plane before sticking them together. I left them to acclimatise in the outdoor porch for a few weeks before starting but i have always assumed that the warping was a function of cheap wood. I was only using a hand held drill so am not sure i would have got the holes in each plank to line up well enough for table-width bars. I do like the idea though - something about it just feels 'right'
Interesting. I did have difficulty with gaps between the table top planks. Looking back i would have spent longer trying to straighten them with a plane before sticking them together. I left them to acclimatise in the outdoor porch for a few weeks before starting but i have always assumed that the warping was a function of cheap wood. I was only using a hand held drill so am not sure i would have got the holes in each plank to line up well enough for table-width bars. I do like the idea though - something about it just feels 'right'
Aug 21st 2020, 1:39 pm
#1698
Magnificently Withering
Joined: Jan 2007
Location: Oakville, ON
Posts: 6,891
Before I start: This is NOT a critical step in building modern table tops and you need not feel wanting for not having put them in. I was just curious.
They are something to tighten up the joints when you are assembling the top, they also give some stability to help with warpage and should the wood dry up a bit and shrink, thereby opening up the joint, you can crank the nuts up on the end of the bar and close up the joint.
Simply put, they are threaded bar which runs in a hole the width of the table (clever folks drill each plank first rather than trying to drill a three foot long hole!!) with a nut on each end. I'd probably use one bar for every three or four feet of length. They are easily spotted in tables, along the long edges, as the ends are capped with wooden plugs so you don't see a manky old nut.
Very much an old school thing, modern glues, kiln dried timbers and expense mean that you don't tend to see them in modern mass production tables.
RE: tensioning bars
Interesting. I did have difficulty with gaps between the table top planks. Looking back i would have spent longer trying to straighten them with a plane before sticking them together. I left them to acclimatise in the outdoor porch for a few weeks before starting but i have always assumed that the warping was a function of cheap wood. I was only using a hand held drill so am not sure i would have got the holes in each plank to line up well enough for table-width bars. I do like the idea though - something about it just feels 'right'
Interesting. I did have difficulty with gaps between the table top planks. Looking back i would have spent longer trying to straighten them with a plane before sticking them together. I left them to acclimatise in the outdoor porch for a few weeks before starting but i have always assumed that the warping was a function of cheap wood. I was only using a hand held drill so am not sure i would have got the holes in each plank to line up well enough for table-width bars. I do like the idea though - something about it just feels 'right'
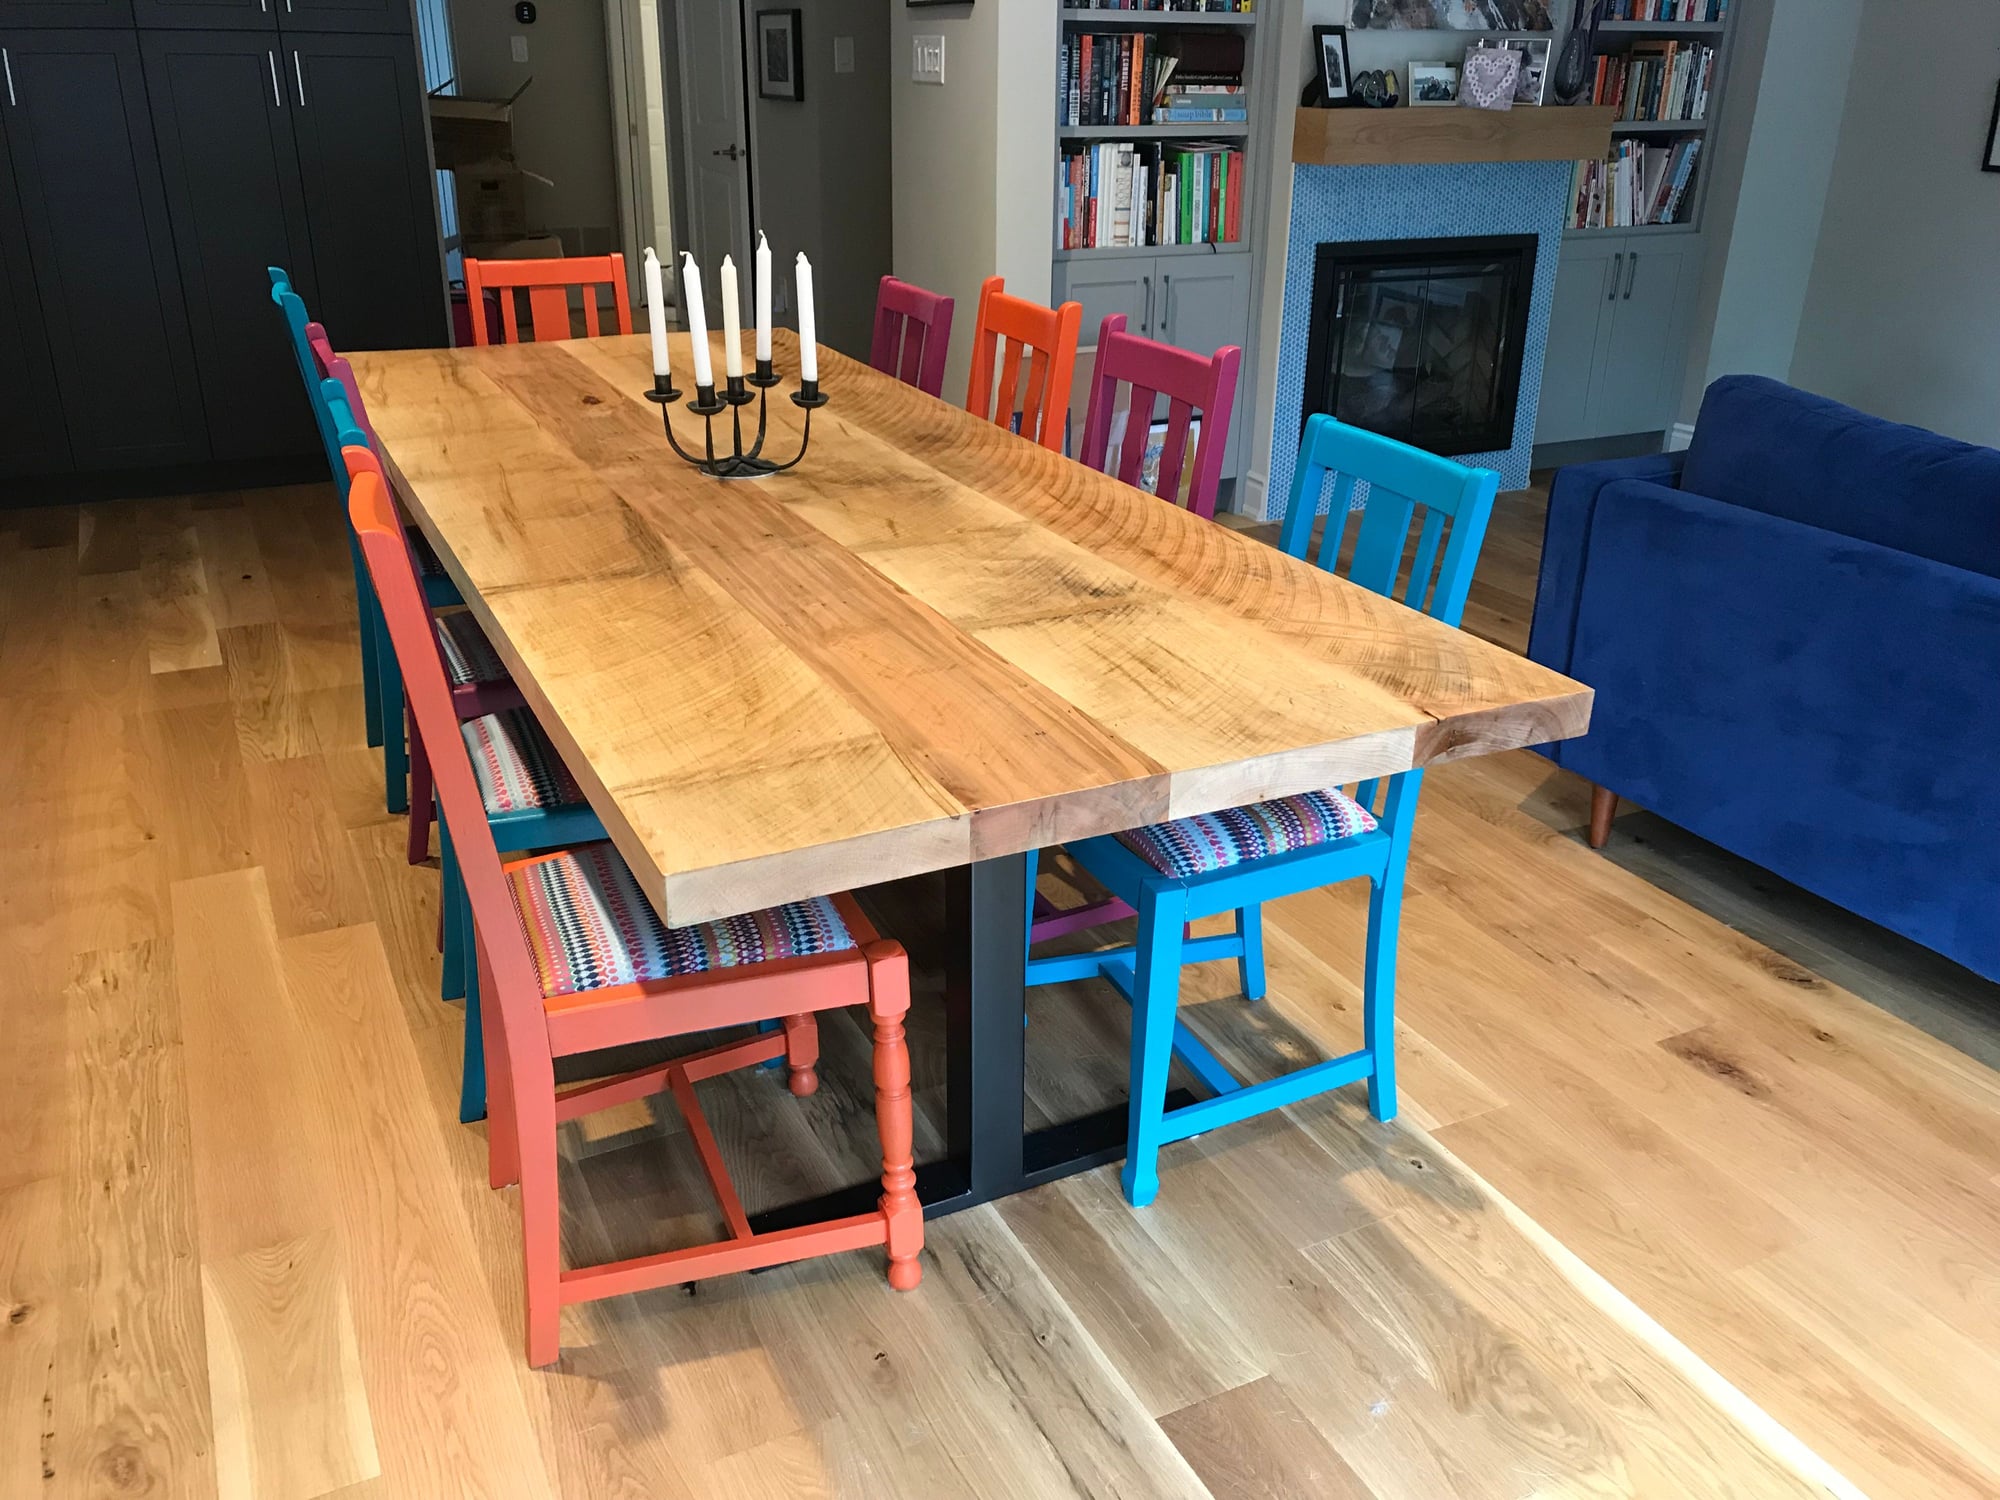
Because the table needed to be wheelchair accessible, the design couldn't incorporate the vertical "web" under the tabletop between the legs - and indeed, the best option for us was to have a T-shaped leg inset from each end, rather than the traditional leg-at-each-corner design. The legs are steel, and are actually in the shape of a sideways H with a flange across most of the width of the underside of the top. The top is made of 2" thick reclaimed maple planks, to give it added stability over its 9'6" length. The interesting part, though, is that about 1/3 and 2/3 of the way along the table, a V-shaped channel has been routered into the underneath, most of the way across its width, that holds an angle-iron bracket, bolted into each plank across the width of the table. That takes a lot of the pressure of the joints between planks, and I'm sure adds a lot to both strength and stability. I hadn't seen that sort of bracket in this context before, but it seems an excellent solution if the planks are thick enough to cut into from the underside. I don't think there's likely to be much movement in the wood, that was probably harvested the best part of 100 years ago and came from an old building, so is pretty well seasoned by now! I'll upload a pucture if I can find one.
Our table was built by the furniture workshop co-owned by the friend of a friend. It's certainly the only piece of furniture I've ever commissioned from a designer, and is likely the only piece I'll ever be able to afford to have made to specification. Mates' rates brought it into the realms of possibility; our previous dining table (which didn't provide enough knee-room for a wheelchair user) was a black-ash-laminated-MDF job from IKEA, which served us pretty well for a dozen years or so and had plenty of life left in it. That was donated to a charity that helps settle refugee families.
[Edited to add picture. The chairs are a mismatched group of early-20th-century oak dining chairs, collected over the years as a set of two from an antiques shop in Chiswick, 4 from a saleroom in Andover (Hampshire, not Mass), and three more from a kijiji ad in Aurora, ON. Some of them were in pretty poor condition, so they've been repaired, painted out in different colours, and reupholstered with stipy fabric. That was done at home, and was a really fun project.]
further edit to add spoilers. The picture's enormous...
Spoiler:
Last edited by Oakvillian; Aug 21st 2020 at 1:52 pm.
Aug 21st 2020, 5:44 pm
#1700
Magnificently Withering
Joined: Jan 2007
Location: Oakville, ON
Posts: 6,891
The chairs were a lot of fun to do. My elderly mother used to be a hobbyist upholsterer, so she provided direction (via FaceTime, mostly) for doing the cushions. I wouldn't have known where to start! And by the time the frames had been patched up and stiffened, and given that we already had white oak floors and now a maple table, we thought a pop of silliness in the multicoloured paint would be the way to go. We did, at least, choose colours that were already in the fabric and are echoed elsewhere in the "scheme" (I'm not really sure we have one of those. I think we'd like to think it's "eclectic country-house chic" but it's probably just "batshit random eccentric").
Aug 21st 2020, 7:13 pm
#1701
Thread Starter
Joined: Dec 2001
Location: Dixie, ex UK
Posts: 52,446
Before I start: This is NOT a critical step in building modern table tops and you need not feel wanting for not having put them in. I was just curious.
They are something to tighten up the joints when you are assembling the top, they also give some stability to help with warpage and should the wood dry up a bit and shrink, thereby opening up the joint, you can crank the nuts up on the end of the bar and close up the joint.
Simply put, they are threaded bar which runs in a hole the width of the table .....

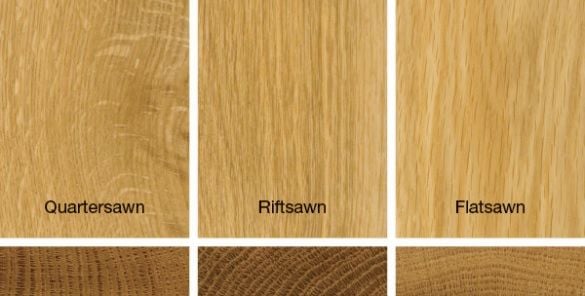
If you are buying construction grade, or basic cabintry grade lumber from Lowes or Home Depot, then you can sort through their 2x's or boards looking for ones with near-vertical grain as large commerical mills don't separate quartersawn lumber, but every log that is flatsawn (sliced starting at one edge and not stopping until you reach the the other side) has 2-4 boards from the center that are quartersawn. So when sorting through the lumber in the store you're looking for pieces that have a "barcode" on the end, not a smile.

FWIW When installing a deck, install the boards with happy faces not sad ones, so when the boards dry out they will dry with a crown and the water will run off. Sad faces will "cup" and the water will collect down the centre of the board.
Last edited by Pulaski; Aug 21st 2020 at 7:35 pm.
 Aug 22nd 2020, 12:47 am
#1702
BE Forum Addict
Joined: Apr 2014
Location: Lauren's Co. SC by way of Palmetto, Florida
Posts: 3,265
So a truss rod for your table.
<snip>
FWIW When installing a deck, install the boards with happy faces not sad ones, so when the boards dry out they will dry with a crown and the water will run off. Sad faces will "cup" and the water will collect down the centre of the board.
<snip>
FWIW When installing a deck, install the boards with happy faces not sad ones, so when the boards dry out they will dry with a crown and the water will run off. Sad faces will "cup" and the water will collect down the centre of the board.
Truss rod, thank you, yes, same concept. Me and proper terminology have a complicated relationship.
I'm picturing your happy and sad faces the wrong way round. My smiley faces turn up at the edges and give cupping which holds water and sad faces turn down at the edges which crown and give good run off, have I misread your post?. Another good reason for installing boards with the crown in the middle uppermost is that it reduces builder liability as cupped edges equal trip hazards.
Edit: Yes I have misread your post. Kiln dried softwood boards are a different beast and some consideration should be made when choosing the face side, most flatsawn boards will display miniscule cupping/crowning and it is best to fit crown up regardless of endgrain.
Last edited by zzrmark; Aug 22nd 2020 at 1:03 am.
Aug 22nd 2020, 2:01 am
#1703
Thread Starter
Joined: Dec 2001
Location: Dixie, ex UK
Posts: 52,446

.... I'm picturing your happy and sad faces the wrong way round. My smiley faces turn up at the edges and give cupping which holds water and sad faces turn down at the edges which crown and give good run off, have I misread your post?. ....
Aug 26th 2020, 4:56 pm
#1705
Heading for Poppyland
Joined: Jul 2007
Location: North Norfolk and northern New York State
Posts: 14,540
Our push mower (Poulan Pro, with a Honda 5.5hp engine) now leaks gas. It seems to be coming from the little plastic tap, that’s between the gas tank and the motor. What do you call that little plastic tap piece? It looks like I could replace it, it’s connected to the tank at one side, and the motor at the other, by short plastic tubes.
Aug 26th 2020, 5:04 pm
#1706
Thread Starter
Joined: Dec 2001
Location: Dixie, ex UK
Posts: 52,446

And you were right - they are supposed to be sad faces!
Aug 26th 2020, 5:11 pm
#1707
BE Forum Addict
Joined: Jun 2015
Location: Near Lynchburg Tennessee, home of Jack Daniels
Posts: 1,381
Our push mower (Poulan Pro, with a Honda 5.5hp engine) now leaks gas. It seems to be coming from the little plastic tap, that’s between the gas tank and the motor. What do you call that little plastic tap piece? It looks like I could replace it, it’s connected to the tank at one side, and the motor at the other, by short plastic tubes.
Its very common for those plastic gas lines to age, crack and leak. I would look into just replacing the entire line and if not equipped a little inline plastic cutoff valve. Oreilly for one sells them. In the fall before storing for winter start mower with the fuel valve shut off to run carb dry. This will keep the carb from getting gummed up from gas evaporation.
Aug 26th 2020, 9:44 pm
#1708
Heading for Poppyland
Joined: Jul 2007
Location: North Norfolk and northern New York State
Posts: 14,540
Robin
Its very common for those plastic gas lines to age, crack and leak. I would look into just replacing the entire line and if not equipped a little inline plastic cutoff valve. Oreilly for one sells them. In the fall before storing for winter start mower with the fuel valve shut off to run carb dry. This will keep the carb from getting gummed up from gas evaporation.
Its very common for those plastic gas lines to age, crack and leak. I would look into just replacing the entire line and if not equipped a little inline plastic cutoff valve. Oreilly for one sells them. In the fall before storing for winter start mower with the fuel valve shut off to run carb dry. This will keep the carb from getting gummed up from gas evaporation.
i was able to buy a no-name plastic cutoff valve in our friendly local chainsaw/Stihl dealer. I’m always amazed at the odds and ends that they sell there. It was pretty easy to fit.
Aug 30th 2020, 9:33 pm
#1709
BE Irregular
Joined: Jan 2004
Location: Tampa Bay Florida
Posts: 4,849
My Whirlpool Fridge/Freezer packed up Thursday evening (12 years old plus). as it did 5 years ago. I assumed the same problem starter relay dead, and got on amazon friday to re order..The one 5 years ago was page not found but had the info for specs, so i searched and ordered an equivalent for $9.00 and it was delivered today sunday 2pm. 10 min job to swap it out. Its back up and running now!
Last time, I panicked and ran out to HD and purchased a small fridge and chest freezer, which worked in the interim, luckily i was on empty in terms of goods in fridge/freezer. Off to do a monthly shop tomorrow.and fill the monster back up
Next job Maytag washing machine also old, stopped doing spin cycle last use but I only use it every 2 weeks or so and can drip dry till i get round to investigating (guessing the connection burnt out on the switch (is actuator the right word?)
Aug 31st 2020, 12:47 am
#1710
Thread Starter
Joined: Dec 2001
Location: Dixie, ex UK
Posts: 52,446
My Whirlpool Fridge/Freezer packed up Thursday evening (12 years old plus). as it did 5 years ago. I assumed the same problem starter relay dead, and got on amazon friday to re order..The one 5 years ago was page not found but had the info for specs, so i searched and ordered an equivalent for $9.00 and it was delivered today sunday 2pm. 10 min job to swap it out. Its back up and running now! ....

Our Bosch dishwasher stopped washing properly, and it appeared that the circulation pump wasn't working - we could force it to drain, but it wouldn't wash. We liked it so much that we called a service technician, but while I was right about the pump, the problem is that that Bosch D/W isn't the usual "tub on legs" design, it's a "tub on a tray" design, so as to make it more or less leak-proof, but the only way to get to the circulation pump is to remove the entire tub off the tray .... which was going to cost $400+ in labour.

Instead we got a new GE Profile D/W from American Freight, for about $500, which more-or-less matches our cooker, fridge, and microwave. After a couple of weeks of hand washing our dishes it was good to get back to having a dishwasher.

I went up on the roof today, to try to fix an annoyingly persistent leak, where the garage/bonus room roof ridge meets the house roof. For several years it has been seasonal, leaking only in the summer, and I assume connected to humidity causing the house frame to expand. So I finally went up on the ridge today and slapped some roofing tar where the ridge meets the house roof and on several nearby joints in the shingles. All we need now is a good downpour to test it. Although I had tried to get up there last year, the difference today was a homemade ridge ladder I made from 2x4's, to hook over the ridge.
Last edited by Pulaski; Aug 31st 2020 at 1:12 am.